Angle grinders are among the most useful tools on any construction site, workshop, or landscaping project. Whether you’re cutting metal, trimming paving slabs, or grinding welds, a grinder can save a huge amount of time.
However, one of the most dangerous problems with this tool happens when a grinder disc comes loose or flies off the machine.
Many people assume this happens while the grinder is running at full speed. In reality, discs often fly off when the grinder suddenly stops.
This usually happens because of a small installation mistake that many beginners – and even experienced users – make.
In this guide you’ll learn:
- Simple safety tips professionals follow
- Why angle grinder discs fly off
- The most common disc installation mistake
- How to install a grinder disc correctly
Watch the Quick Safety Tip
This quick video demonstrates the correct way to seat and tighten a grinder disc so it stays secure during use.
Why Angle Grinder Discs Fly Off
In most cases, the disc itself is not the problem. The issue usually comes down to how the disc is installed on the grinder.
Angle grinders use a two-part flange system:
- The inner flange that sits on the spindle
- The locking nut that clamps the disc in place
If the disc is not fully seated against the inner flange before tightening the nut, the disc may appear tight but is actually not properly secured.
When the grinder suddenly stops, the rotational force can cause the disc to shift slightly. If the disc shifts far enough, the locking nut can lose grip and the disc may eject from the tool.
This is why discs sometimes fly off right after you release the trigger, not while the grinder is cutting.
Other possible causes include:
- Incorrect flange orientation
- Incorrect replacement flange
- Using damaged or warped discs
- Dirt or debris between the disc and flange
- Incorrect disc size
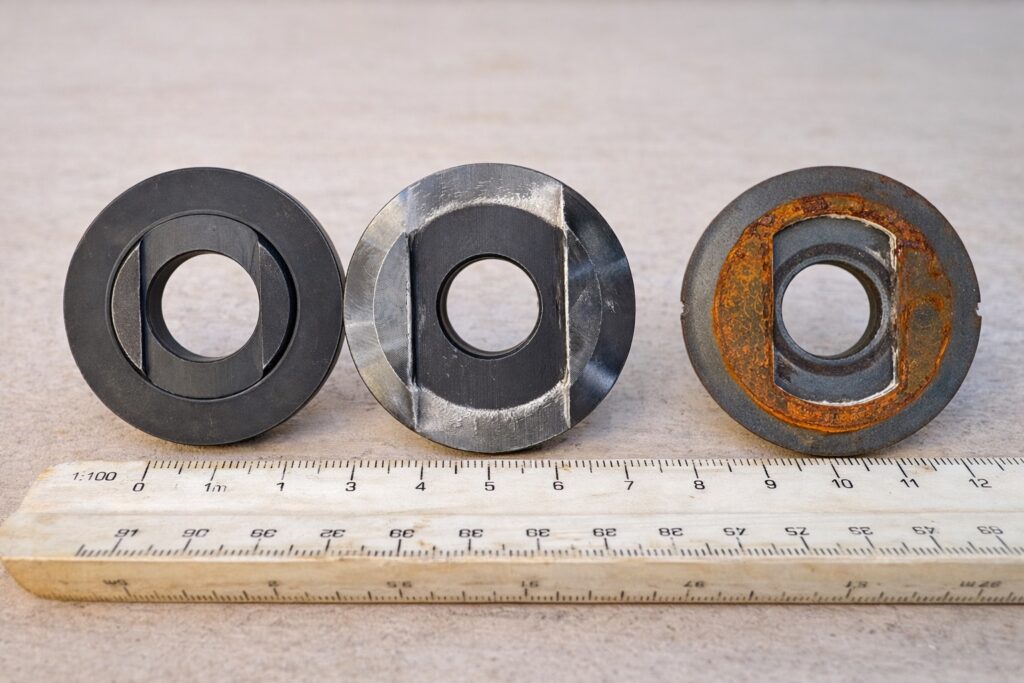
In the image above you can see three different types of inner flange. The first one has a bigger bore hole than required (the locking nut too). The middle one – original one. The last one has correct bore hole but the shape won’t allow to install it securely. Check what you buy.
Understanding these causes helps prevent a potentially dangerous situation.
The Most Common Grinder Disc Installation Mistake
The most common mistake happens during installation.
Many users place the disc on the grinder and immediately tighten the nut without checking whether the disc is properly seated in its dedicated position on the inner flange.
Because the disc sits loosely on the spindle before tightening, it can be slightly misaligned.
Once the locking nut is tightened, the disc may appear secure even though it isn’t fully seated.
A simple trick professionals use is to hold the grinder with the disc side facing upward while installing the disc.
Gravity helps the disc settle into the correct position before the nut is tightened.
This small step greatly reduces the chance of installation errors.
How to Install an Angle Grinder Disc Correctly
Following the correct installation process only takes a few seconds and can prevent serious accidents.
Step 1 – Disconnect the Power
Always unplug the grinder or remove the battery before changing discs.
Accidental startup while installing a disc can cause severe injury.
⸻
Step 2 – Inspect the Disc
Check the disc for:
- cracks
- chips
- uneven wear
- manufacturing defects
Never install a damaged disc.
⸻
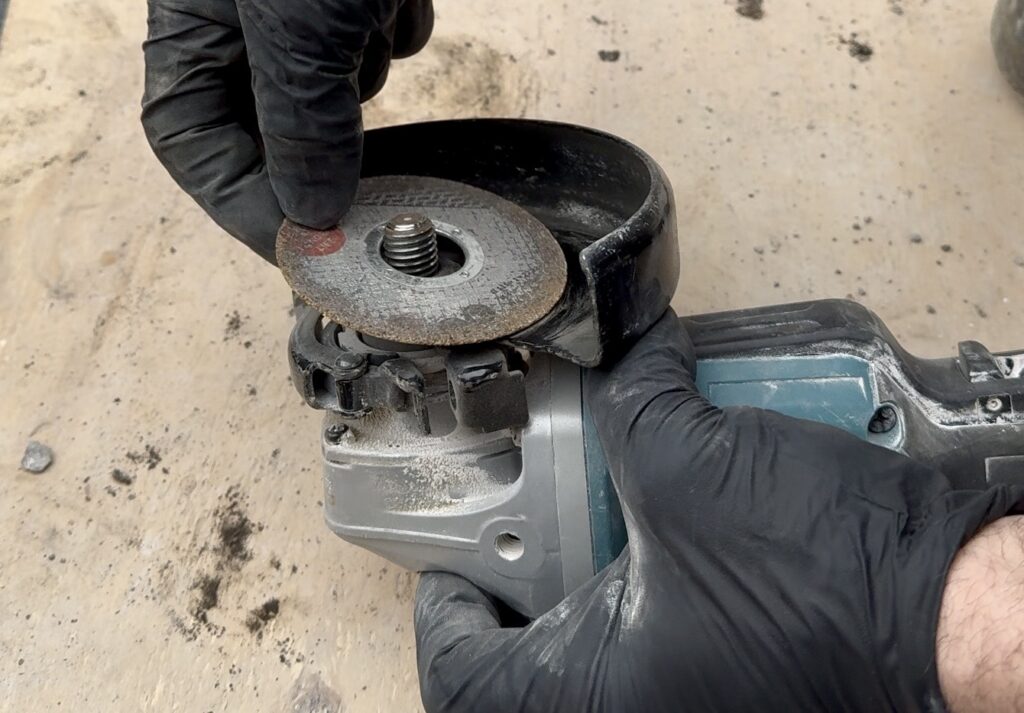
Step 3 – Place the Disc on the Inner Flange
Position the disc on the grinder spindle so it sits properly on the inner flange.
Make sure it rests flat and centered.
⸻
Step 4 – Hold the Grinder Disc Side Up
Turn the grinder so the disc side faces upward.
This allows gravity to help seat the disc correctly in its position.
⸻
Step 5 – Install the Locking Nut
Thread the locking nut onto the spindle.
Ensure the correct side of the nut faces the disc depending on the disc type.
⸻
Step 6 – Tighten the Nut
Use the supplied spanner wrench to tighten the nut.
Important tip:
Tighten it firmly but not excessively.
Overtightening can damage the disc and make removal difficult later.
⸻
Step 7 – Perform a Test Run
Before starting work, briefly turn the grinder on and then off.
Stand to the side while doing this.
If the disc is not seated correctly, problems often appear when the grinder stops, not when it runs at full speed.
Testing the tool first helps identify issues before cutting begins.
Important Angle Grinder Safety Tips
Angle grinders are powerful tools and should always be used with care.
Here are a few basic safety practices professionals follow.
Always Wear Proper Safety Gear
Use:
- safety glasses or a face shield
- gloves
- hearing protection
- appropriate work clothing
Grinding sparks and debris can cause serious injury.
Never Stand Directly Behind the Disc
When testing a grinder, stand slightly to the side.
If a disc fails, it usually travels in the direction of rotation.
Use the Correct Disc Type
Grinding discs, cutting discs, and flap discs are designed for different tasks.
Using the wrong disc increases the risk of breakage.
Replace Worn Discs
Thin or heavily worn discs are more prone to failure.
Replace discs regularly rather than pushing them beyond their limits.
Do X-Lock Grinders Have This Problem?
Some modern grinders use a tool-free mounting system such as Bosch X‑LOCK Angle Grinder System.
These grinders eliminate the traditional flange nut and allow discs to snap into place with a click.
Because the disc locks directly into the mounting mechanism, incorrect installation is much less likely.
However, even with these systems it is still important to inspect discs and follow proper safety practices.
Recommended Angle Grinder Tools and Discs
There is a wide range of angle grinders available today to suit different needs, preferences, and budgets.
Most of the tools I use are from Makita. That’s mainly due to circumstances and the battery platform I already use on site rather than brand loyalty.
The tool shown in the video is the Makita DGA517 Cordless Angle Grinder, which features a paddle switch and electronic brake.
Makita also offers versions with the Makita X‑LOCK Angle Grinder System, a quick-change disc mechanism that eliminates the need for a locking nut and spanner.
This system can help prevent incorrect disc installation and makes disc changes much faster.
Frequently Asked Questions
The most common cause is improper seating of the disc on the inner flange. Holding the grinder disc-side up during installation helps prevent this issue.
Discs should be tightened using the supplied spanner wrench. However, they should not be overtightened.
Many disc failures occur when the grinder suddenly stops, not while it is running at full speed.
Yes, but proper training and safety precautions are essential. Understanding correct disc installation is one of the most important steps.
Final Thoughts
Angle grinders are incredibly useful tools, but small mistakes during disc installation can create serious safety risks.
The good news is that preventing grinder discs from flying off is usually very simple:
- make sure the disc is seated correctly
- hold the grinder disc side up during installation
- tighten the nut firmly but not excessively
- test the grinder before starting work
Following these steps takes only a few seconds but greatly reduces the risk of accidents.
Taking the time to install your grinder disc properly can make your work both safer and more efficient.